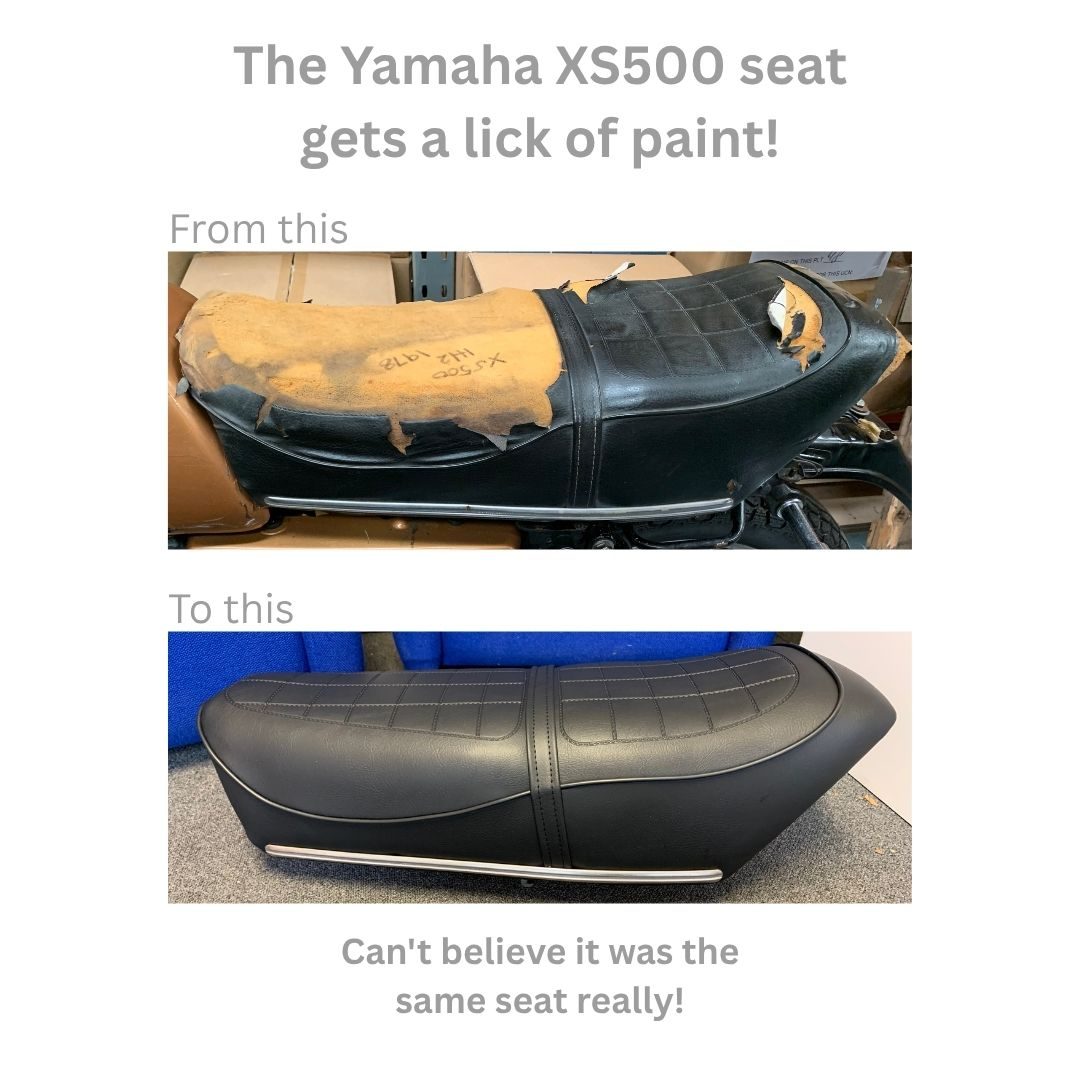
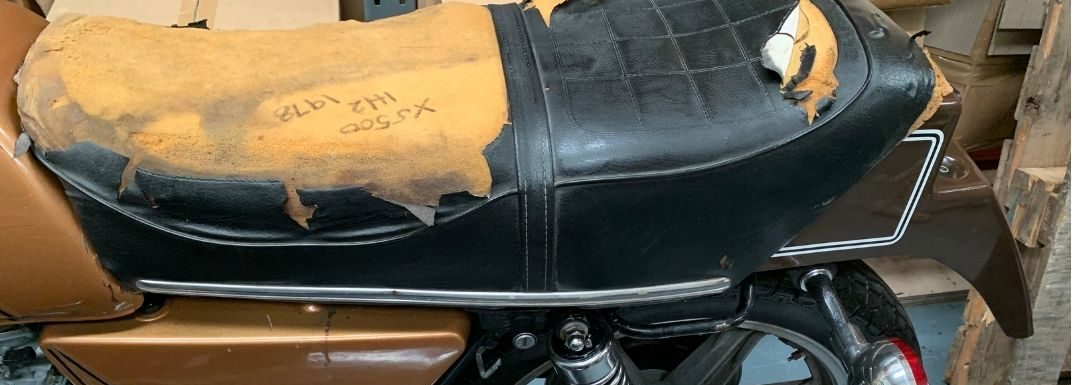
The Yamaha we bought recently was indeed in great condition but the seat had a small rip in the back, not any more! We also found the Brown livery not to our taste so that's also about to change.
This bike is going to shine as we have managed to get the seat looking almost out of the box good, thank you Les at Saddlecraft for your amazing work! The paintwork is nearly ready (Kevin at Dream Machine) so shortly we will have the most gorgeous XS500 we have seen for many a year! Happy days.
Whilst we were there we dropped the Moto Morini's seat in making a start on what will undoubtedly be a complete rebuild!
We ask what exactly is going on in the parts for sale market for old motorcycles and is this the future?
Did the seller of this ever see a Yamaha XS500 A or B? Well if they have they have a short memory as although this seat "technically" may fit the frame mountings of the XS500 A or B models it would conflict with the rear cowling, it is simply not the right seat for the bike advertised! Now that aside for a moment, and it is a bit of a dealbreaker to be fair, let's look at the deal they offer for this "supposed" Yamaha XS500 A or B model seat, a whopping £300+ price tag sits alongside this beauty no less and for that we could have had our old seat in pretty much any condition as long as it was solid refurbished into an "as new" one that was right for the application, read our article on the Yamahe XS500 seat which cost under £200 to rebuild!!! Well for a moment assume you knew what it was off, probably the Yamaha Custom at a guess but that is just what I say it is, a guess albeit educated, then this seat is still a whole lot of cash. Now you may say "oh well, they may have made a mistake, something lying around, it can happen" We take your point but the seller of this item is a proper unit, they call themselves a catchy name to address the trade objectives and have sold thousands of items on Ebay. This is a growing trend but if you think that is stretching it a bit prices can be far worse than that, recently listed was a set of Refurbished Carbs for a 400/4 a snip at just over £1300 and a non British Rear Mudguard c/w rear light assembly "used" for a smidge over £500!
You need to put this into perspective as also available for sale on Ebay is a zero miles fully refurbished Honda CB400/4, may we point out this comes complete with it's carbs and a rear light ... oh, and the rest of the whole bike!!! for £4000. It is "buyer beware" out there and bargains, well they seem to be fast disappearing into a mini corporate "private / business" world ... sadly.
As you can see, the seat is totally incorrect for this bike

The correct, if not a bit worse for wear seat, this one we will have rebuilt and it will be as good as new.
Some images to show you how far a bike can go and still, we think, get back to show quality!
Tank CB500/4
Tanks are a massive part of a restoration, they are one of the shiny bits we all touch and comment on, that said the insides can be a real problem, this one however is really clean ... inside anyway!
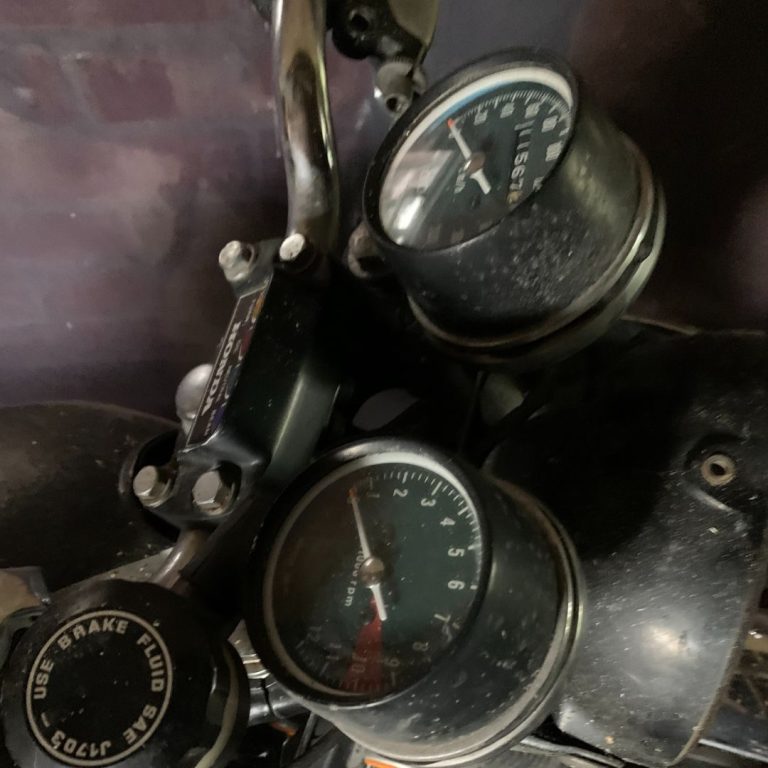
Clocks
Clocks are so important on a rebuild, almost always the dials are showing signs of age, primarily sun fade but also the casings are covered in chips and scratches, still mostly they are saveable with some time and care!

The Frame
Someone has gone to a lot of trouble and no doubt cost chroming this frame, we see a lot of different approaches over the years to make the bikes more "bespoke", for us it is originality that matters, within reason. Will she stay chrome? No, of course not, she will be returned to her original black, in powder coating not paint although original was paint we find it just looks better ... so did the guy who chromed this I guess, sorry buddy!
Switchgear
Originals are originals, yes you can get reproductions today but a bit of time and some red paint and your away. Very tricky inside as they have ball bearings all over, tiny connectors etc, that said where's the fun otherwise!
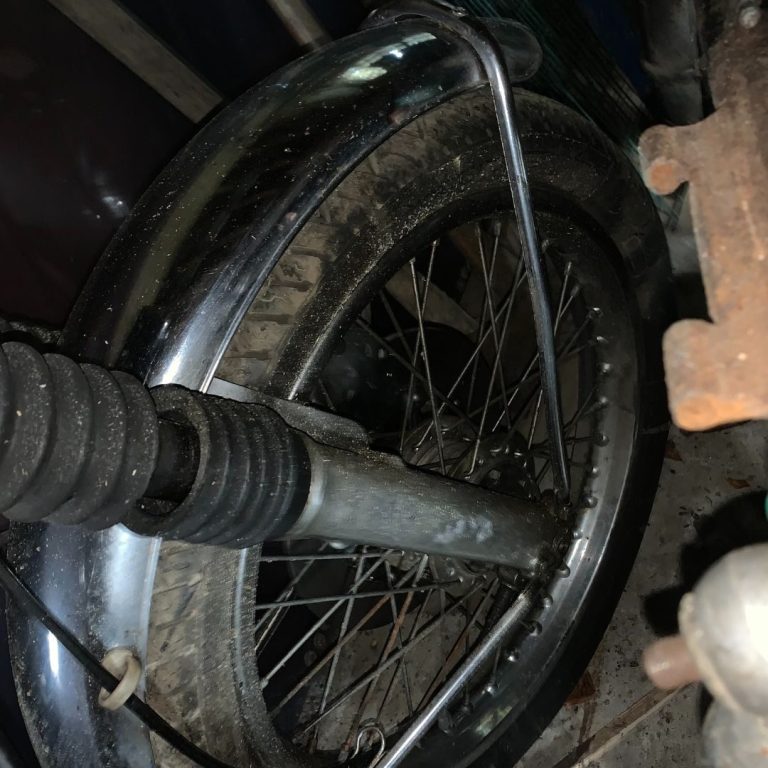
Wheels
Tricky one wheels, we think best left to the professional to be honest, the lacing is all well and good, replacement parts are abundant but to get the wheel set at the right place on the hub, that is in the right line left and right, exactly, is not for the amateur, to the wheel man methinks!
Alloy Castings
Ive seen worse, these though typically can be brought back to shiny new condition. Always remember that if the alloy is there it will buff up, takes time of course, beware if it is so far gone the metal is literally pitted beyond polishing, rare but happens.
Allen Bolts may be one of the easiest 'modifications' you can get but the benefits are massive
You will have got a flavour of the bores and we just like it the way it was, well most of the time anyway.
Purists close your ears as we are going to try and convince you to move to allen keys, or, to give them their correct title 'socket head cap screws' as a valuable upgrade to your motorcycle and one, although not original, used by us in the late seventies as the stock bolts were pretty easy to destroy the head.
Allen bolts are readily available in zinc plated steel or stainless steel from your local tool merchant, both very reasonably priced with the better of the two stainless being between 10p each to 30p each (M6 20mm - 65mm) when buying in 10's, we have invested in a box to go with them as they tend to go in 5mm increments and this is difficult to see, easier to read a label obviously.
So, why? Well a couple of absolute no brainers are ease of removal and torque settings. With an allen head the withdrawal is done in total command of the bolt, you are typically holding the ratchet on an extension pressed firmly in place, and that is where the head stays, force is easily applied on the wrench and the bolt is nowhere near as capable as the socket head. With all Hondas of this age the head, you think looks like a Philips, is actually not, it is a JS (Japanese Standard) head, not a problem but it still is far less capable to apply pressure in an opening direction without the screwdriver head lifting out of position and damaging the head.
When putting back these bolts it is recommended to pop a bit of oil on the thread but even then they can be very hard to take out again, even with care damage can be done.
Allen bolts simply don't have this problem, the bit does not want to lift upon turning and as such stays put.
Then there is the tightness, we use 6Nm as being a benchmark, easy with the allen heads as we can use a small torque wrench, if you have not got one have a look at a cycle wrench, they are normally set to 5-6Nm and will do the job perfectly well.
We use Stainless bolts as we feel they look that bit better, in the olden days stainless was quite the thing so we are being closer to the way it was than you may think.
Cons, cost of course, that said we buy our bolts from a tool merchant, see suppliers and can be bought in small quantities for little money. Then there is authenticity and we agree, they are not as OEM supplied but they are probably closer to the bikes we actually rode?
David Silver still sells genuine bolts for various casings, we though won't be partaking in them, we will be picked up at shows but we will wax lyrical as to why we believe these are more right than wrong.
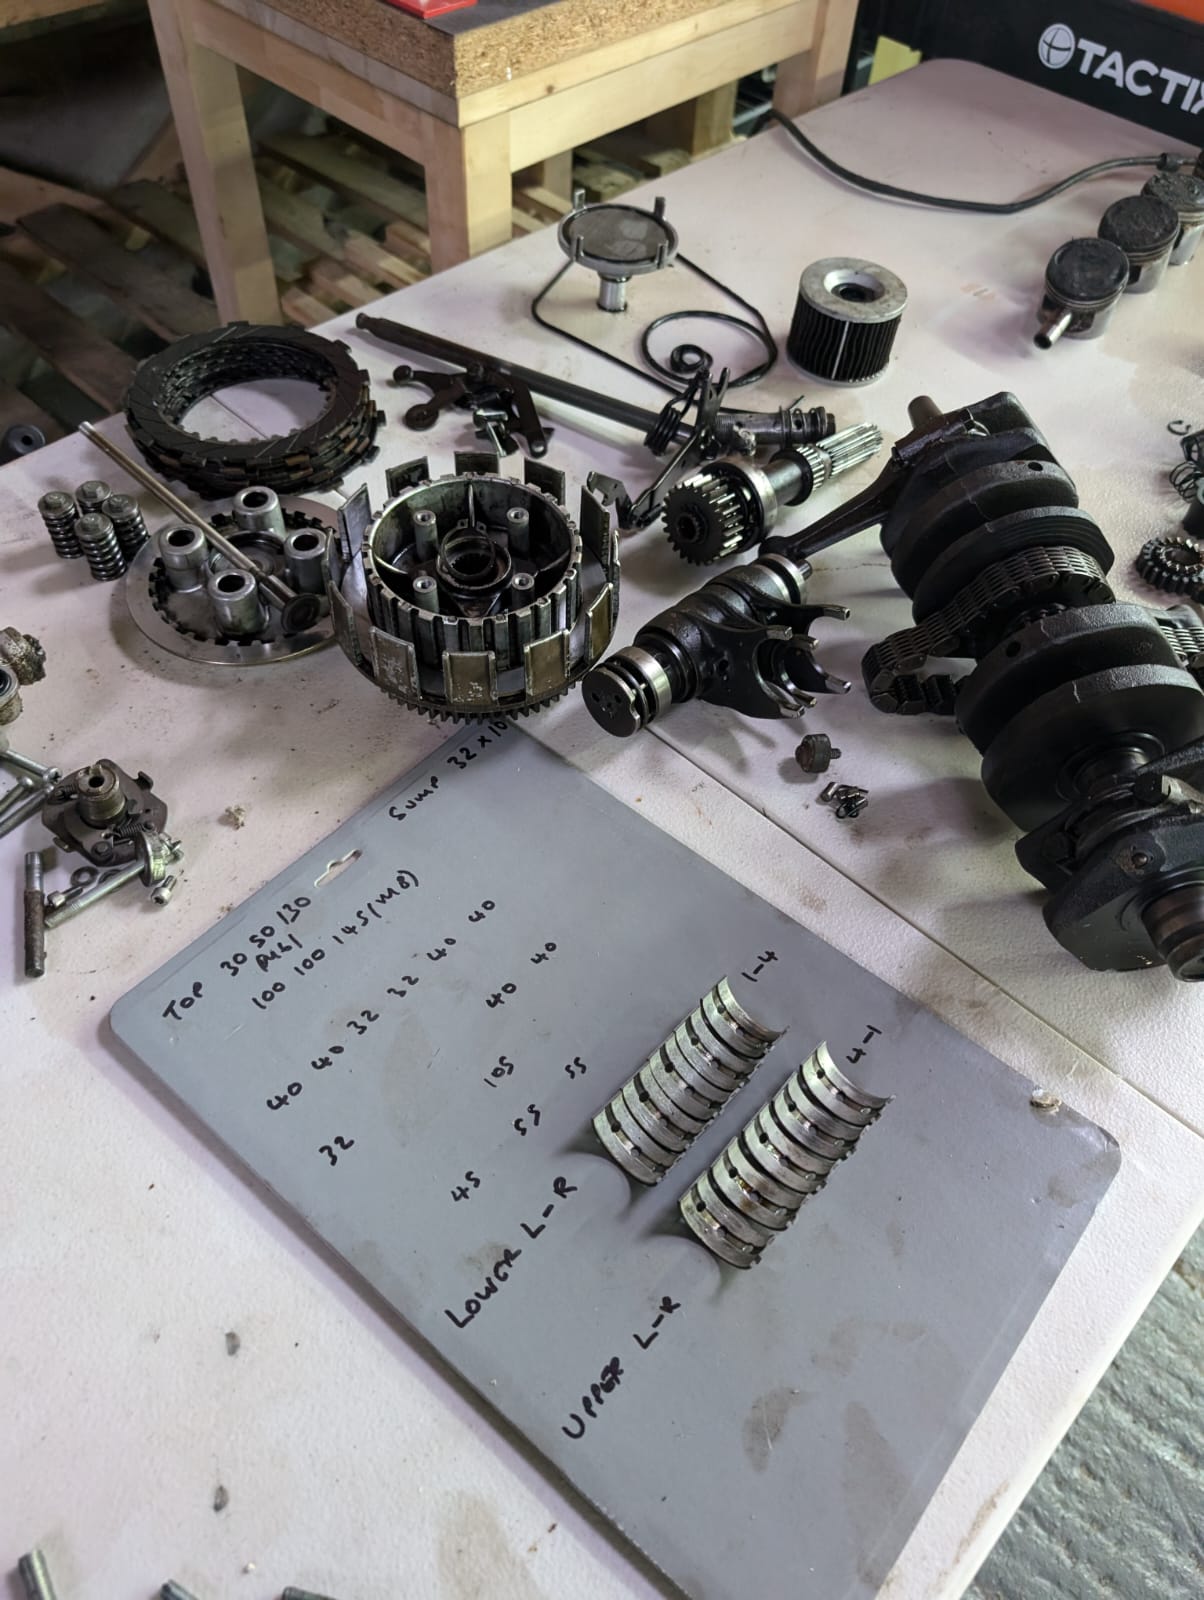
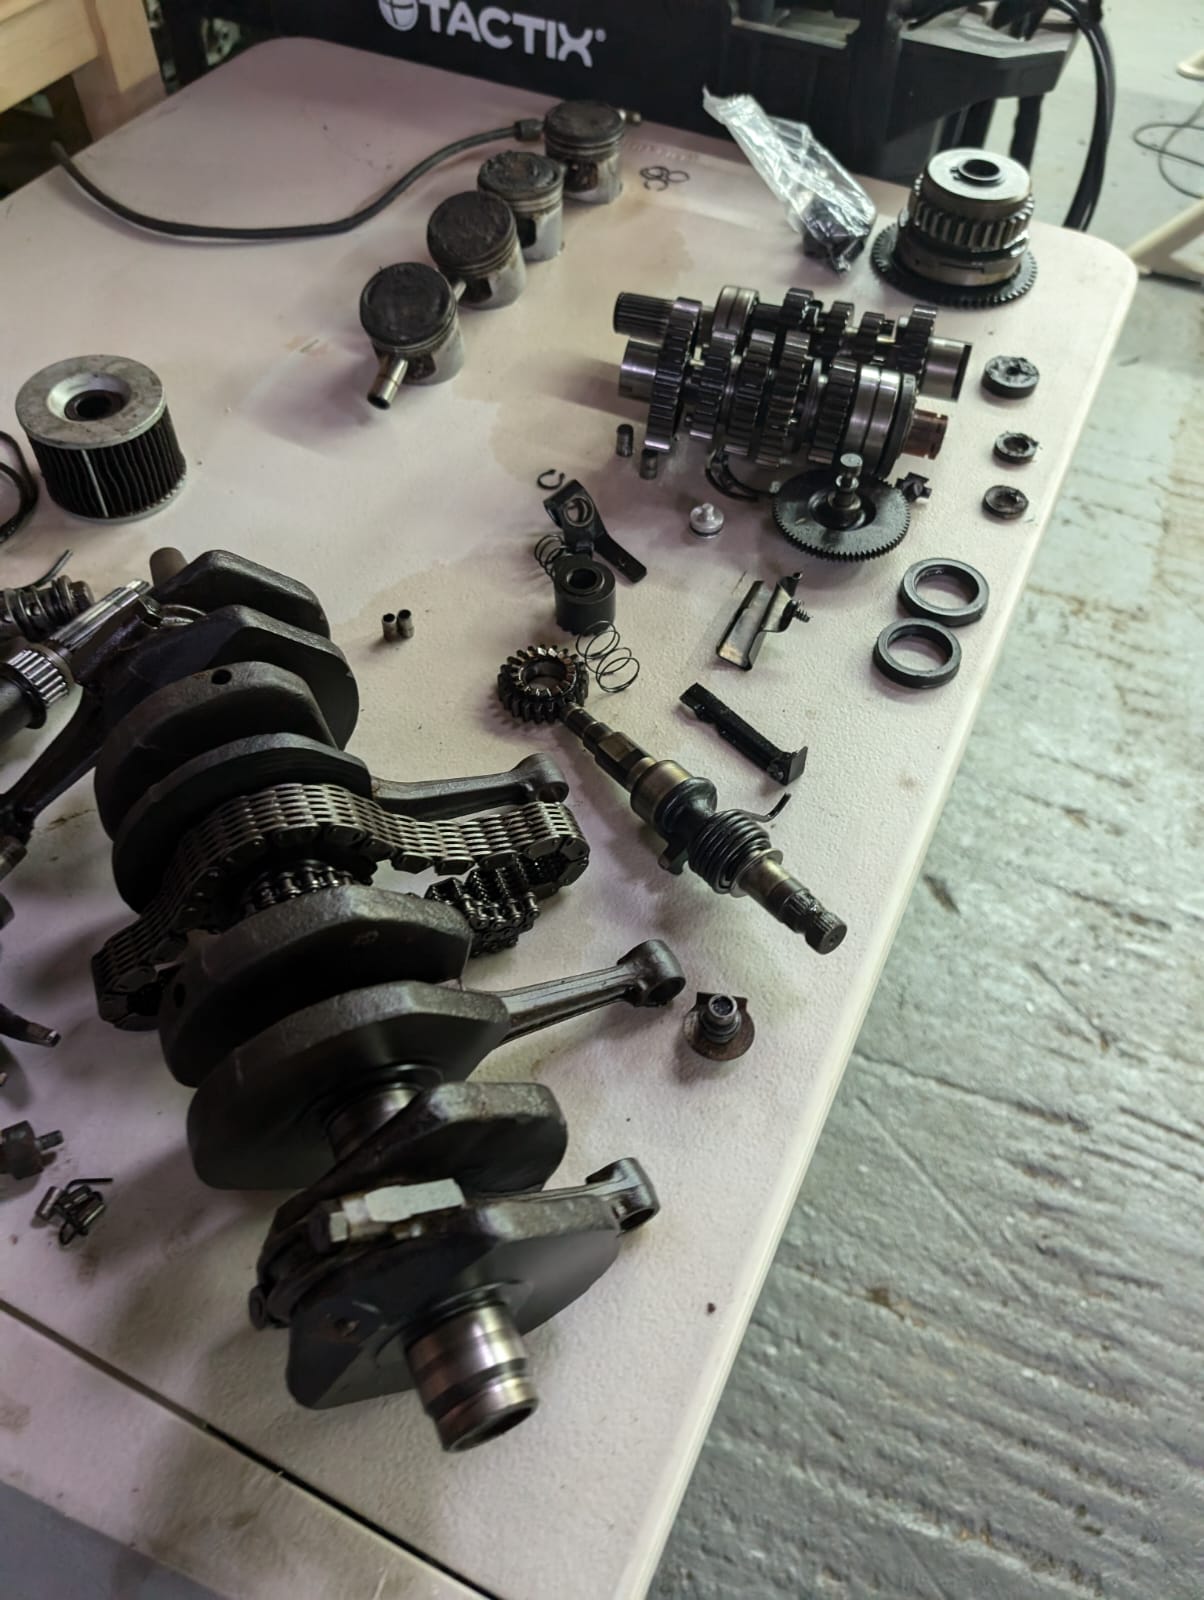
Esmerelda's Total engine rebuild
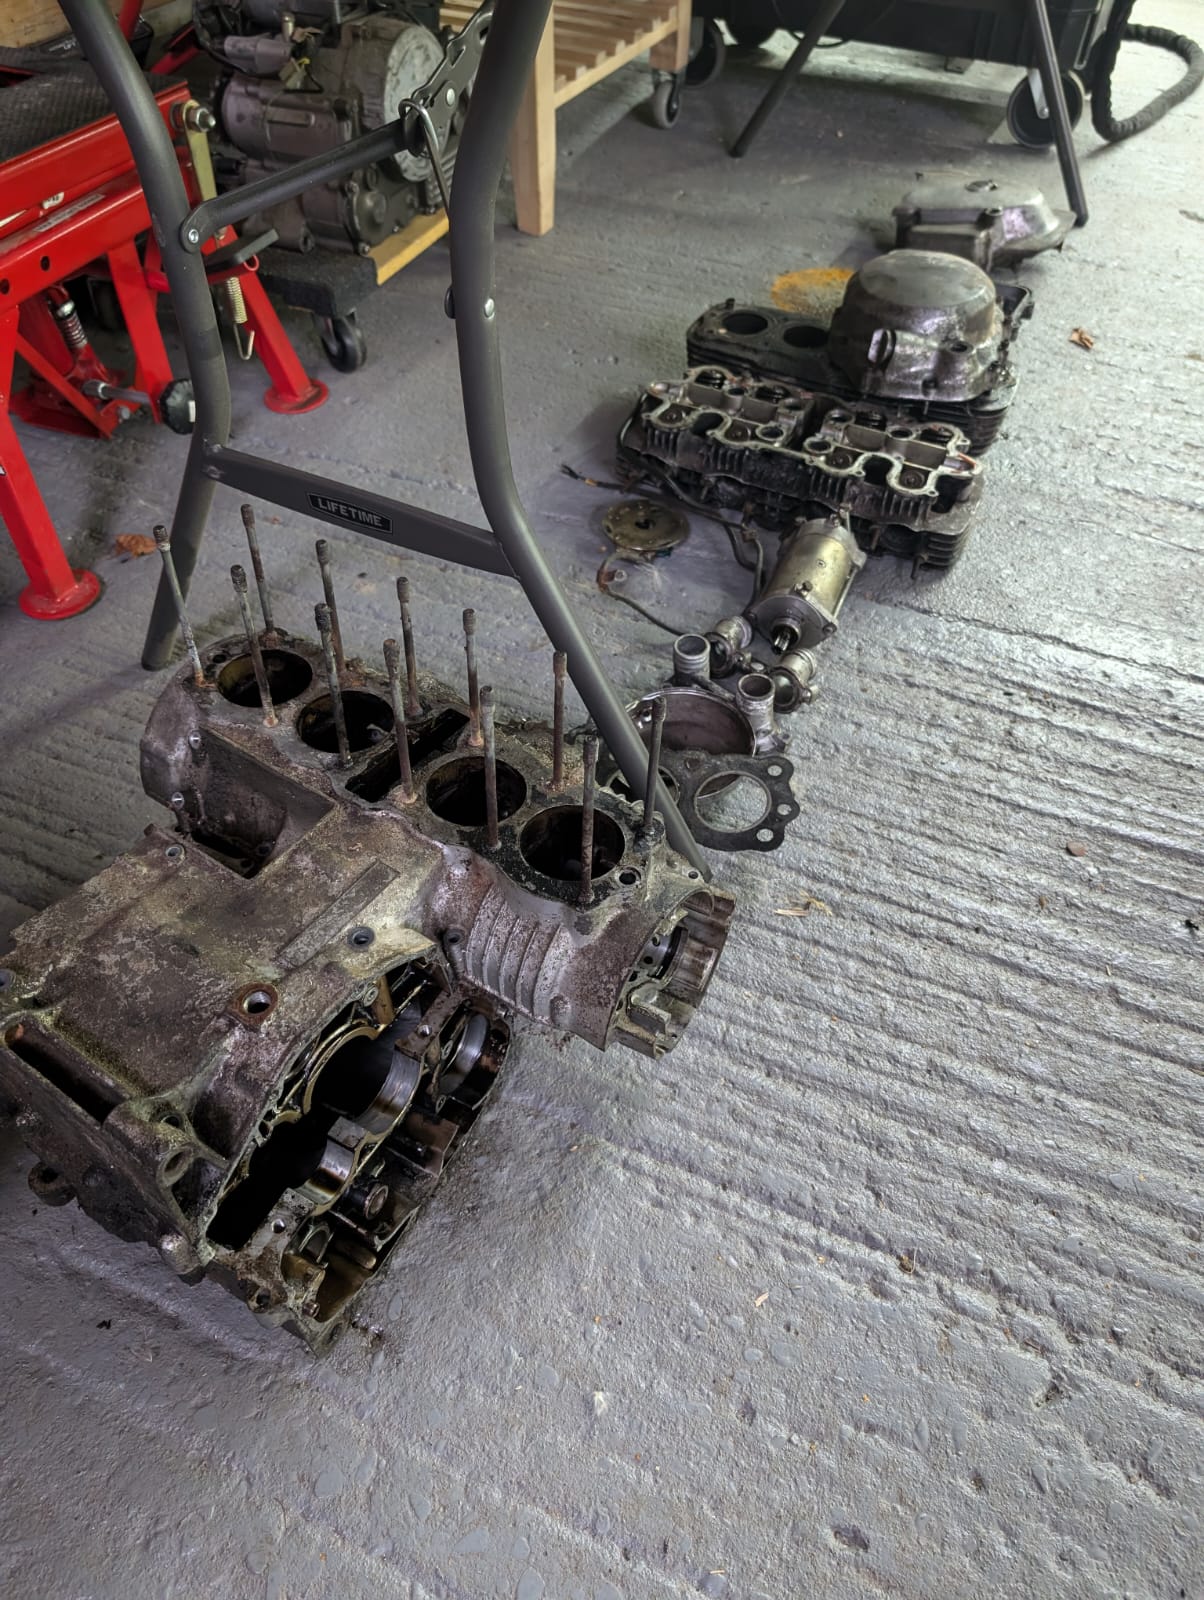
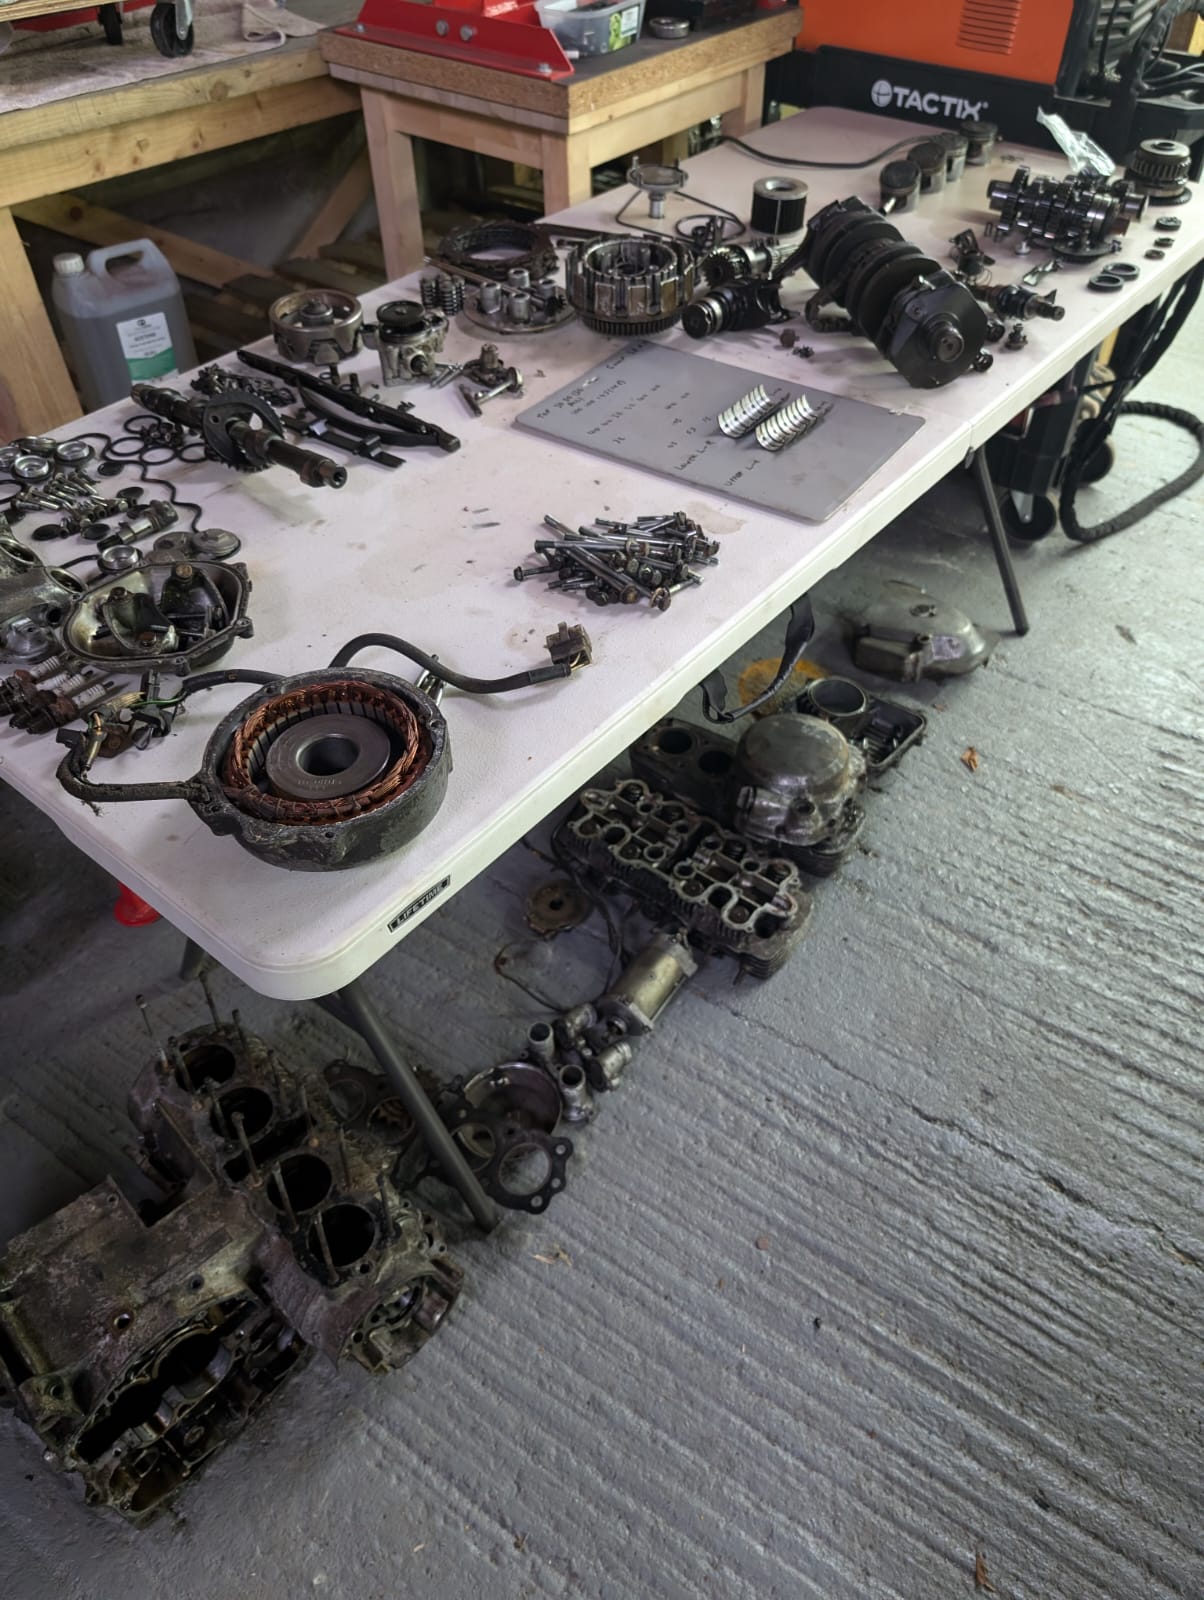
We acquired this engine from the black bike pictured, really more as a job lot of parts than a bike to be honest from the Isle of Wight, We have taken a view on her and are about to do a complete nut and bolt renovation, the engine though we were not sure if it was too far gone and could not economically be saved, it had sat for many years without pipes on and was in an absolute mess, that said "luck favours the brave" as they say so out she went for stage one, lets have a look and see what we have got!
Well the good news it we have a good engine, okay it needs some cosmetics but the working parts are in amazingly good nick! The oil was really dark but the strainer was free from major debris, the cambelt tensioner still had the original grooves and was in really good condition, nice and strong, very good. The gear selector was as it should be, the gears all present without any teeth missing, this was a really underused engine, yes possibly a rebore and new pistons, a new cam belt of course but other than that we are talking vapour blasting and a new process we are going to be the first to try a clear coat for the engine, exciting! We will show you more as we progress with her.
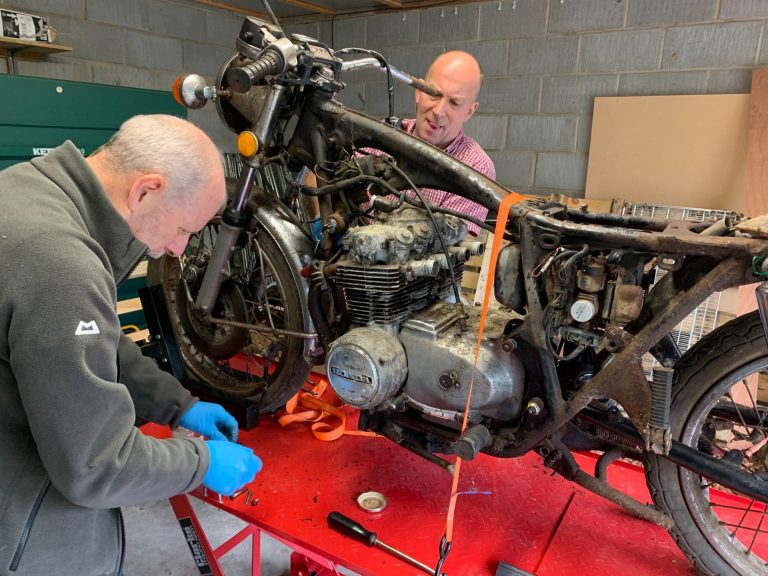
For now see a pretty grubby but totally sound CB500/4 engine on the bench and the even more grubby bike!

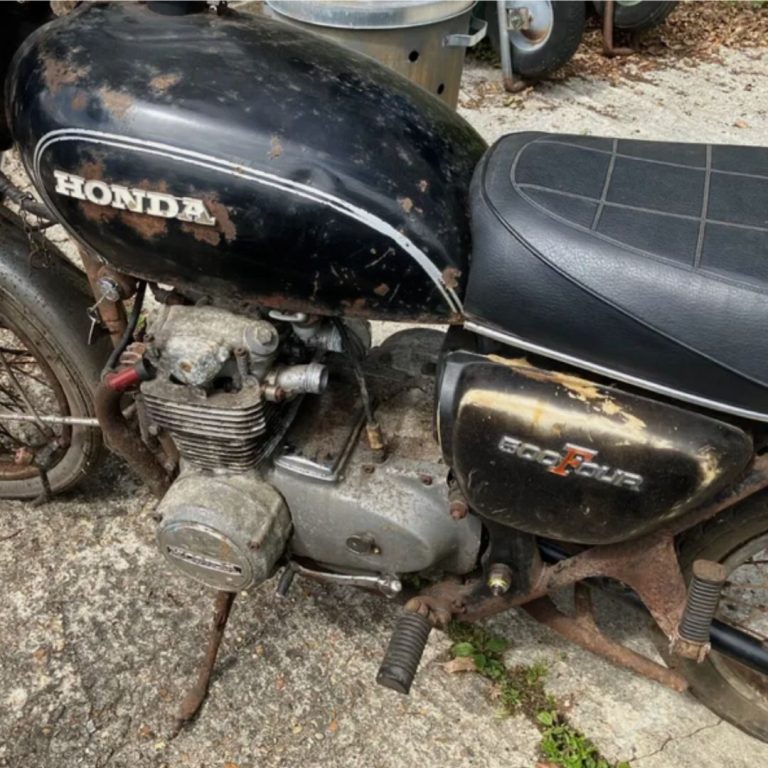
Esmerelda
The elements have really tried there best to kill this old Honda but you know, we think she has a chance!
The Frame
Truthfully pretty rough but there are probably worse out there. We will need to be careful that all the welds are still in good shape so powder coating does not simply cover any serious issues. Parts are already being prepared, the rear swinging arm, side and main stand, tail light assembly (she, as with all our bikes) is English so it's black not chrome, are already done. The next batch includes the exhaust brackets, battery box and various brackets on the bike.
The Electrics
Wiring is always an issue as anyone who has worked on these bikes will know the earth is so important, especially now we powder coat the old frames, not that the earth goes through the frame typically, but it does in places for example the front indicators. Anyway corrosion of the connectors is usually the main culprit. Still the actual harness when you open one up, even after 50 years, is normally very clean. The regulator looks tatty, probably works though as with the rectifier. The harness is in parts, we may end up replacing the rear for looks as you see it when the seat lifts but otherwise it is a clean up job we hope.
The Wheels
The wheels are in a bad state, to be fair they typically are. These will be our first wheel rebuild using DID rims, the hubs will have the bearings taken out and replaced where necessary and vapour blasted, new steel spokes and a pair of new boots will complete the picture hopefully!
The Front End
Well the good news is it is there, obviously the head will need a look, hopefully a good clean and grease together with the correct torque on the head should do the trick. Re the clocks these are a total rebuild but there not too bad actually. New hydraulics would be wise, a front brake overhaul is in order and a look at the stanchions. There is some chrome work on the top end but it will all go in together.
The Tank seat and sidepanels.
We luckily have a tank and side panels in the paint shop going to be the beautiful Bucchus Olive Green and the seat will be off to Saddlecraft for a total refurb, they will powder coat the base, replace the foam and cut a new cover. Once again it is all there, this is really something I think newcomers to the hobby can learn from, if the bike your buying is all in front of you at least you know what your dealing with, if not getting the correct parts at anywhere near a good price is becoming more and more difficult.
The Engine
Looks pretty bad doesn't it? Well as it has stood for goodness knows how many years without pipes or carbs on you would not be expecting much, but you would be wrong. The engine has had little use and is in amazingly good condition, see our section on the total rebuild of a CB500/4 engine. It will be a diamond we think when ready.
CB500/4 Clutch adjustment
To reset a clutch or address a heavy clutch on a CB500/4 K1 there are a few things worth knowing..
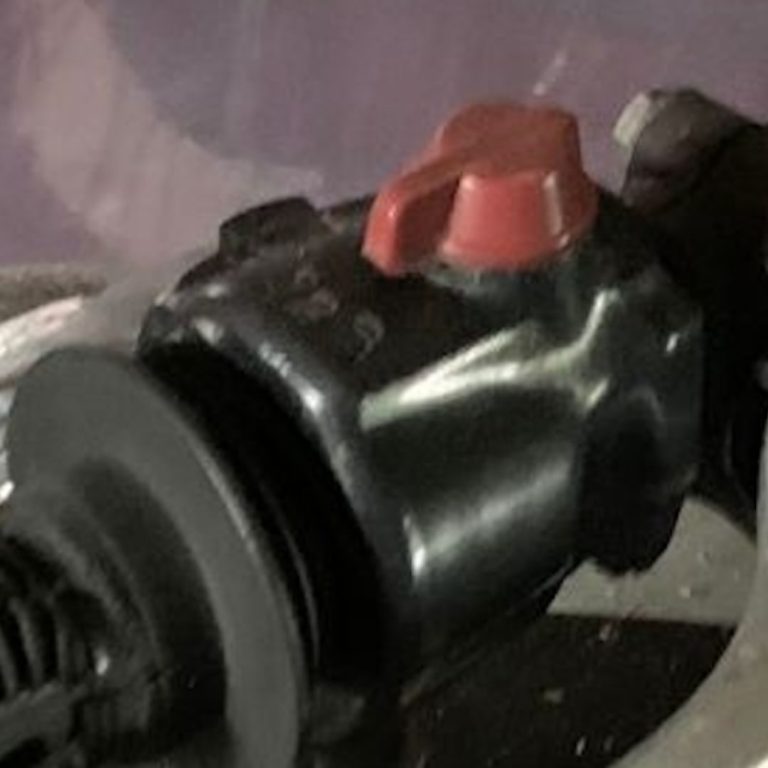
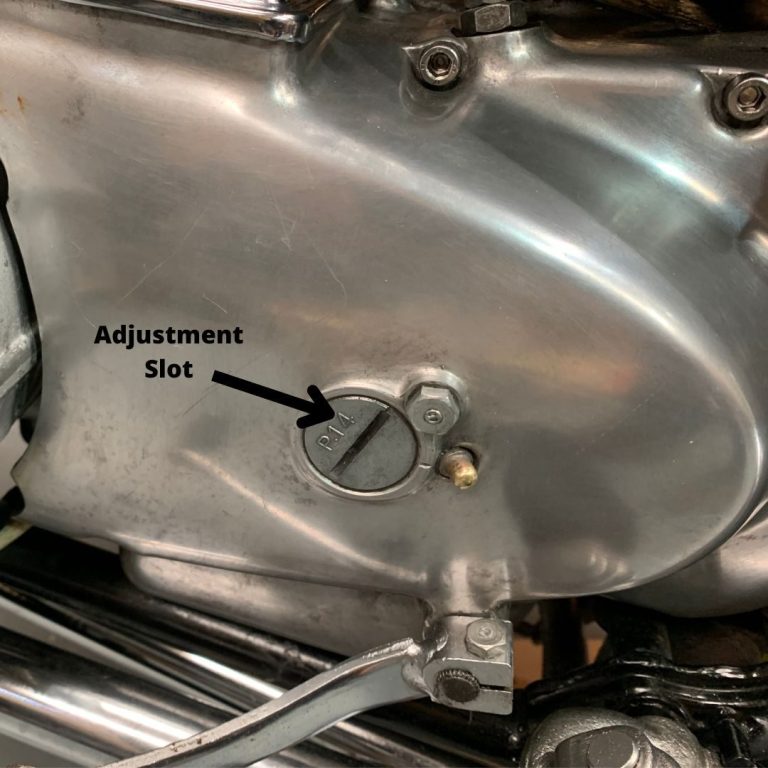
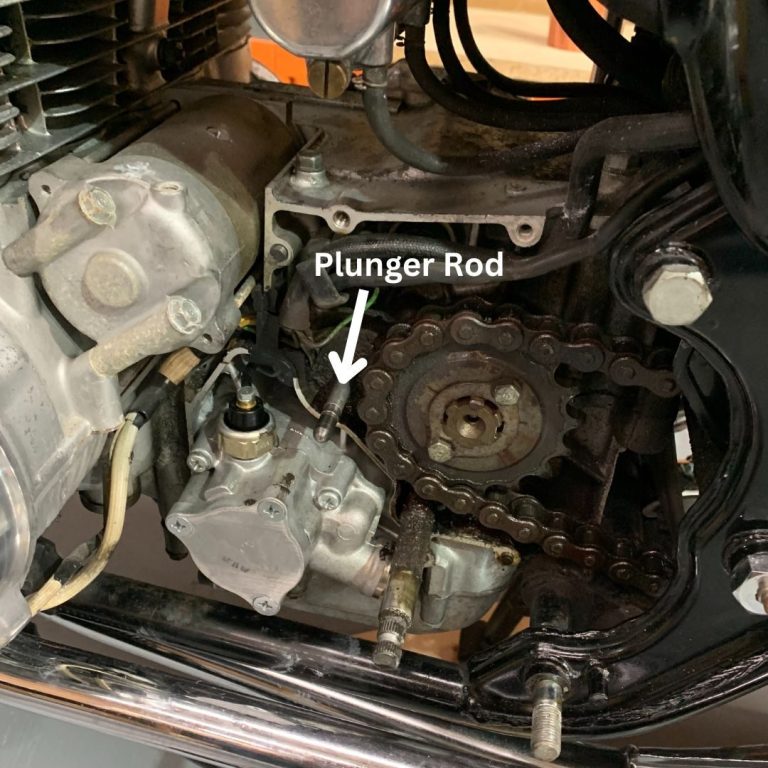
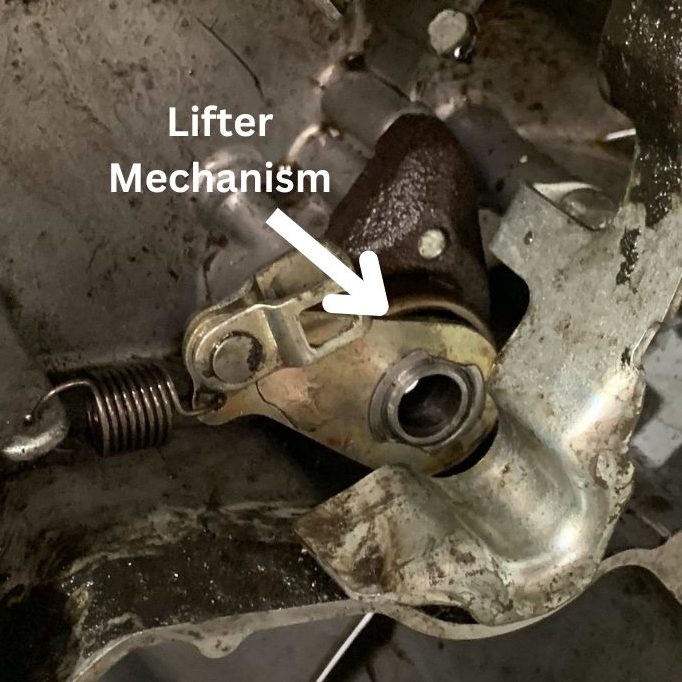
Firstly if you have a heavy clutch there are five easy fix culprits, firstly the cable is possibly rusty inside and needs replacing, if this is not the problem check the cable routing, make sure it has not been forced around in a way it is uncomfortable, this will also work against an easy clutch and thirdly ensure the lifter, see picture, is well greased and moves freely.
If these are all okay remove the plunger rod and ensure it is perfectly straight and free from any debris, if there is any grit on the rod thoroughly clean, grease and reinsert. Finally you get to adjusting the lifter, the main way of adjusting the clutch on the CB500/4 K1.
To check the adjustment of the lifter you need to release the 10mm bolt on the outer casing, see image, turn the large flat headed slot until the lifter is in its most retracted position, then with all the cables let off to their loosest setting turn the adjustment slot in a clockwise direction until it bites, then back a smidge. Once set retighten the nut to lock it in position. Now you have set the lifter to the right setting take up the slack on the cable with the base and lever adjustments as necessary. Check the clutch is working safely before taking the bike out, these are not instructions on how to do the job simply information as to what we did. If you are not 100% confident in what you are doing don't do it and contact your local garage.
Can be tricky, 5/10 Difficulty level
The Honda CB500/4
Why did Honda reduce the size of their bikes and engines, we are referring to the '69 launch of the iconic CB750/4, when the trend of the day was bigger, faster and generally the more nuts the better and make the 500cc version, the CB500/4?
If you think that this comment is a bit simplistic we take your point as it probably is, we argue that you should look to the CBX brought out a short time later, it was launched in '78, and you can see where the Honda designers were looking towards with this, the most unreal inline six engine, 6 carbs to balance, like as if, we were just blown away, can this get any more surreal? Honda gave the guys at MCN one to test at the launch, I guess knowing full well what they had and we were treated to her on the front cover of MCN spinning her rear wheel changing up a gear at 100MPH! I know I cannot ever forget it, unbelievable.
Back to the plot, so with all of this to come reduce it they did and they did it because feedback on the 750 was probably negative on the overall bulk and sheer mass of the thing, remember they were taking on the Triumph's of the day, they must have wondered if they had this one wrong? The CB750/4 was, and still is today a thing of beauty, but like the Victorians, who liked a bit of large, it had been on no diet, in fact, again like the old Victorians, it was showing off its size as a thing of beauty, which it was for both we feel, but to ride her, steady on, was a different matter. The CB 500/4 was a considerable 80 pounds lighter than the CB750/4 and that made a real difference back then as it does today.
Although the new CB500/4 was destined to be made only for a short time, information conflicts on this online however it was launched in 1971 and we currently own a 'P' reg, although we think a '75 exactly when it left the Honda factory is unknown and we have heard 1978 as the last date but we doubt it, certainly in the UK as the K6 came along in '74 then the CB550 F1 in '75 and F2 in '78 and of course a CB750 F1 in '77 which was certainly around the UK streets in '78.
So we got this amazing bike, looking back together with the 400/4 was surely Honda at it's most inspired moment, she was manageable, no moped to be fair but she would easily knock around town without constant attention, on the open road she was always lacking a 6th gear for me but you could easily up the rev range and you were rewarded with a bucket full of enthusiasm she had stored away waiting for you all along. Her frame was a frame of the 70's so let's not get excited but she would fall into corners at low speed and stay fairly stiff in high end ones, no Italian but decent enough for the day.
Braking was a single disc, pathetic in todays terms but again it stopped you, albeit sometimes there was room for improvement shall we say.
The bike was a great bike of the day and even now will keep you happy enough on an open road, but that was not her trump card, that was her beauty and boy oh boy did she play that one right, she was a looker.
It todays world of same old same old vehicles this era was indeed special, every stroke of the designers pen appears to have had flair in it, look at the tank, the way it gracefully marries the seat to the yoke, the pipes, a four into four with tulip designs on the ends, these were made for a purpose, to look amazing and they did. The whole bike from any angle looks right, even from above, see the image below.
So the world was treated to this iconic machine, beauty, power, handling, agility she had it all. Once you rode the CB500/4 you were hooked, it was a pungent cocktail of the like we had never seen before, mine was a really poor example back in the day, see the grainy image below sporting four into two aftermarkets with some dubious modifications and mostly ran on 3 in the wet but I loved her, for me she was my magic carpet and strangely I feel every bit the same today,.
People of the modern world I give you the Honda CB500/4, more than just an old motorcycle your dad used to ride, it's a piece of art which to this day still finds itself at the centre of attention for all the right reasons.


Honda's route to stardom
It was back in 1969 when Honda introduced the first four-cylinder 750cc motorcycle the CB750.
Honda wasted no time once they realized what they had and quickly followed this bike with the beautiful CB500/4 in 1971, then maybe the least loved, and for good reason, in 1972 the CB350/4, this being superseded by the amazing CB400/4, an unbelievable machine for the day which was adored by so many.
The CB400/4 was developed in tough times for Honda having limited R&D funding but still featured, for the first time, a six speed box, something the CB500/4 never had although Honda did add it to the 550 engines realising it was needed. Another striking change was the sweeping four into one exhaust pipes, such a recognisable feature and one people today still see as quite dramatic.
The 400/4 showed the new sleek racing style of Honda which was a move away from the CB350/4, CB500/4 and early CB750/4's being smaller, lower front end and a more agile sporty bike by the whole.
The CB400/4 was no match for the KH models or other 2 strokes of the day but what it lacked in raw speed it rewarded it's owner far more in refinement, reliability and smoothness.
It was a bike that had a surprisingly short sales life being discontinued allegedly for exhaust regulations, sound familiar, in 1978 after some 100,000+ models were sold worldwide.
The bikes were followed by a new Honda 550/4 F2 Supersport and a 750 versions, both using the sweeping four into one exhaust and very similar sporty appeal.
The inline four cylinder Honda's revolutionised the motorcycle engines of the day, They were soon surrounded by Suzuki GS550, 750 and 1000cc models, Kawasaki Z650's, 750's, notably 900's and 1000cc models to name a few. To say Honda broke the mold is unquestionably true and the mold would never be the same again.
We look back at these times with real affection, today they just don't make bikes with the charm, charisma and certainly chrome that they did back then, Okay say we are bias, agreed we probably are but that doesn't mean were wrong!
Specifications CB500/4
Models K0, K1 and K2
Tyres
Front 3.25 in. x 19 in.
Rear 3.50 in. x 18 in.
Colours available. Candy Jet Green, Candy Garnet Brown, Star Light Gold, Black, Candy Gold, Flake Sunrise Orange, Maxim Brown Metallic and Bucchus Olive Green.
Engine In-line four-cylinder SOHC
Compression Ratio 9.0:1
Fuel Tank Capacity 16.8 Litres
Oil capacity 3.64 litres
Electrics 12v 110 watt
Battery 12v, 12ah
Wheelbase 1.41 mtrs
Curb Weight (wet) 203.7 Kilos
Seat height (operational) 80.5cm
Top Speed 105mph
Fuel Efficiency 41mpg
What do 70's Hondas and Crypto Currency have in common?
People are starting to see them as a way of making a fast buck!
So we are certainly seeing more and more increases in 70's motorcycle prices which I suppose we expected, that said prices are not rising faster than anticipated. It is fair to say pretty much in line with our thoughts, interested people are getting more and more to the retirement age and ask themselves what they are going to do now, cars are both too big and too difficult to work on, you just end up lying under the stupid thing to fix it then leave it in the elements letting rust do it's thing. So bikes, well not such a problem as we can tuck them away at the back of the garage, a simple bike lift is costly, circa £550, but allows garage like facilities without crawling along the floor, bikes just fit the purpose and to boot are absolutely beautiful pieces of art.
So far so good and the supply of old bikes seems very plentiful, we see hundreds of them every day on popular auction sites, social media platforms, classic motorcycle shops and of course those live auctions that love to add 18% plus to the hammer price, buyer beware!
So are bikes the problem, well as it turns out no, there not, however we have been buying spares for some time now typically from auction sites and we cannot believe what people recently have been asking for parts, let me give you some examples, currently as I write this there is listed for sale a CB400/4 fuel filler cap, asking price is £78.97 yet at David Silvers you can buy the same one for £54.00, a new battery is listed at £77.75 yet again David Silvers is £47.94!
Now you may think I am splitting hairs but wait on as for me their taking the proverbial!
A set of carbs £1000, a tank that looks like the kids have been playing football with it at a penny off £100, an old rough rear wheel £155, used starter motor almost £75, dynamo cover at near £68 with a beaten up scratched one asking £25, 4 used inlet rubbers £36.99 and the list goes on, just remember here those inlet rubbers are best bought new and only cost £34.80 at Silvers and although the others may be original in this case then they are certainly going to be pretty hardened and I suggest the new would be a far better bet.
Am I being picky? Possibly and I guess I should be pleased these are available I hear you say, but when you can buy a complete CB400/4 engine for £595 currently available on 'you know where' these prices are best seem speculative, at worst they are taking the p*** of us hobby guys who are looking to put these bikes back to great condition, we all want to make a bit somewhere along the line I get that but not many of us renovators do this for profit, if this goes on we are at risk of monetising our hobby where people look to buy the bikes that we want to restore simply to strip them and sell them back to us as we need the parts, maybe they already are!
To be honest we all know that if you build a new car from spare parts bought at a dealer it would cost a fortune, let's not become like these greedy b***rds and keep this hobby an honest one.
Ours is a hobby for decent people, please don't treat us like cash cows available to finance your needs!
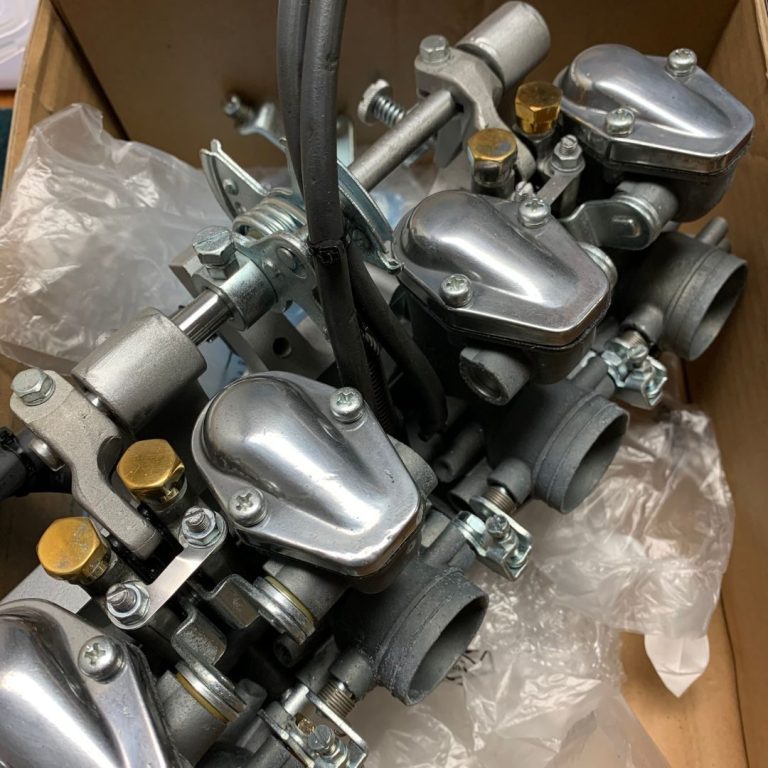

An overview of the Honda CB400/4 1978 carbouretter, it is fairly simple but only once you know whats going on!
The Keihin VB22 carburettor used in the 1978 Honda CB400/4
This is a mechanical slide carburetor designed to precisely mix air and fuel before it enters the engine. Each of the CB400/4’s four cylinders has its own carb working in unison to deliver smooth and balanced performance, fuel enters the central carb and flows outwards to fill all 4 evenly. Understanding how these carbs work requires looking at the major components and how they interact during various stages of engine operation.
1. Air Intake and Venturi
Air enters the carb through the air intake and passes through a narrowing called the venturi. A venturi effectively is a narrowed passage which increases air flow and in turn reduces pressure, this is the same effect that lifts a plane in flight as air passes over the wing. This vacuum draws fuel into the airstream. The throttle slide controls how much air is allowed through the venturi. It’s connected to the throttle cable so as the rider twists the throttle the slide lifts allowing more air to pass through.
2. Fuel Delivery System
Fuel enters the carb from the tank via a fuel line and fills the float bowl, a small reservoir at the bottom of the carb. Inside this bowl, a float and float valve regulates fuel level. When the bowl fills the float rises and closes the valve to stop more fuel from entering, maintaining an exact level. This is a precise part of the carb, look to set the floats 22mm from the open base of the carb and adjust in 1mm movements to ensure the carb does not overfill or restrict fuel to the cylinders.
3. Jetting and Mixture Control
Fuel is drawn from the float bowl through a series of jets, a pilot jet sometimes known as an idling jet delivers fuel at low throttle openings and idle as the name suggests, this is the smaller of the main jets and be careful they are handed 1 and 2 cylinder are opposite to 3 and 4 in there location. The main jet handles fuel delivery at mid to high throttle openings.
The jet needle, attached to the throttle slide sits in the needle jet otherwise known as an emulsion tube, this is the largest of the jets. As the slide rises, the needle lifts out of the jet, allowing more fuel to flow depending on throttle position.
Air passes through the air correction passages to mix with fuel drawn through the jets ready for combustion. An air screw (or pilot screw) allows fine-tuning of the fuel-air ratio at idle by adjusting how much air mixes with the pilot circuit. This is set by the number of turns out from fully screwed in.
4. Choke and Starting
For cold starts, the carb uses a choke which adds extra fuel to the mixture to help the engine start and run until it warms up operated by a manual lever linked to all four carbs.
5. Tuning and Synchronisation
Correct tuning involves adjusting the air screw, ensuring proper jet sizes (based on exhaust and airbox setup), and synchronising all four carburetors so they operate evenly. Synchronisation is done using a set of 4 vacuum gauges to balance airflow across cylinders at idle which albeit tricky is easier than it sounds.
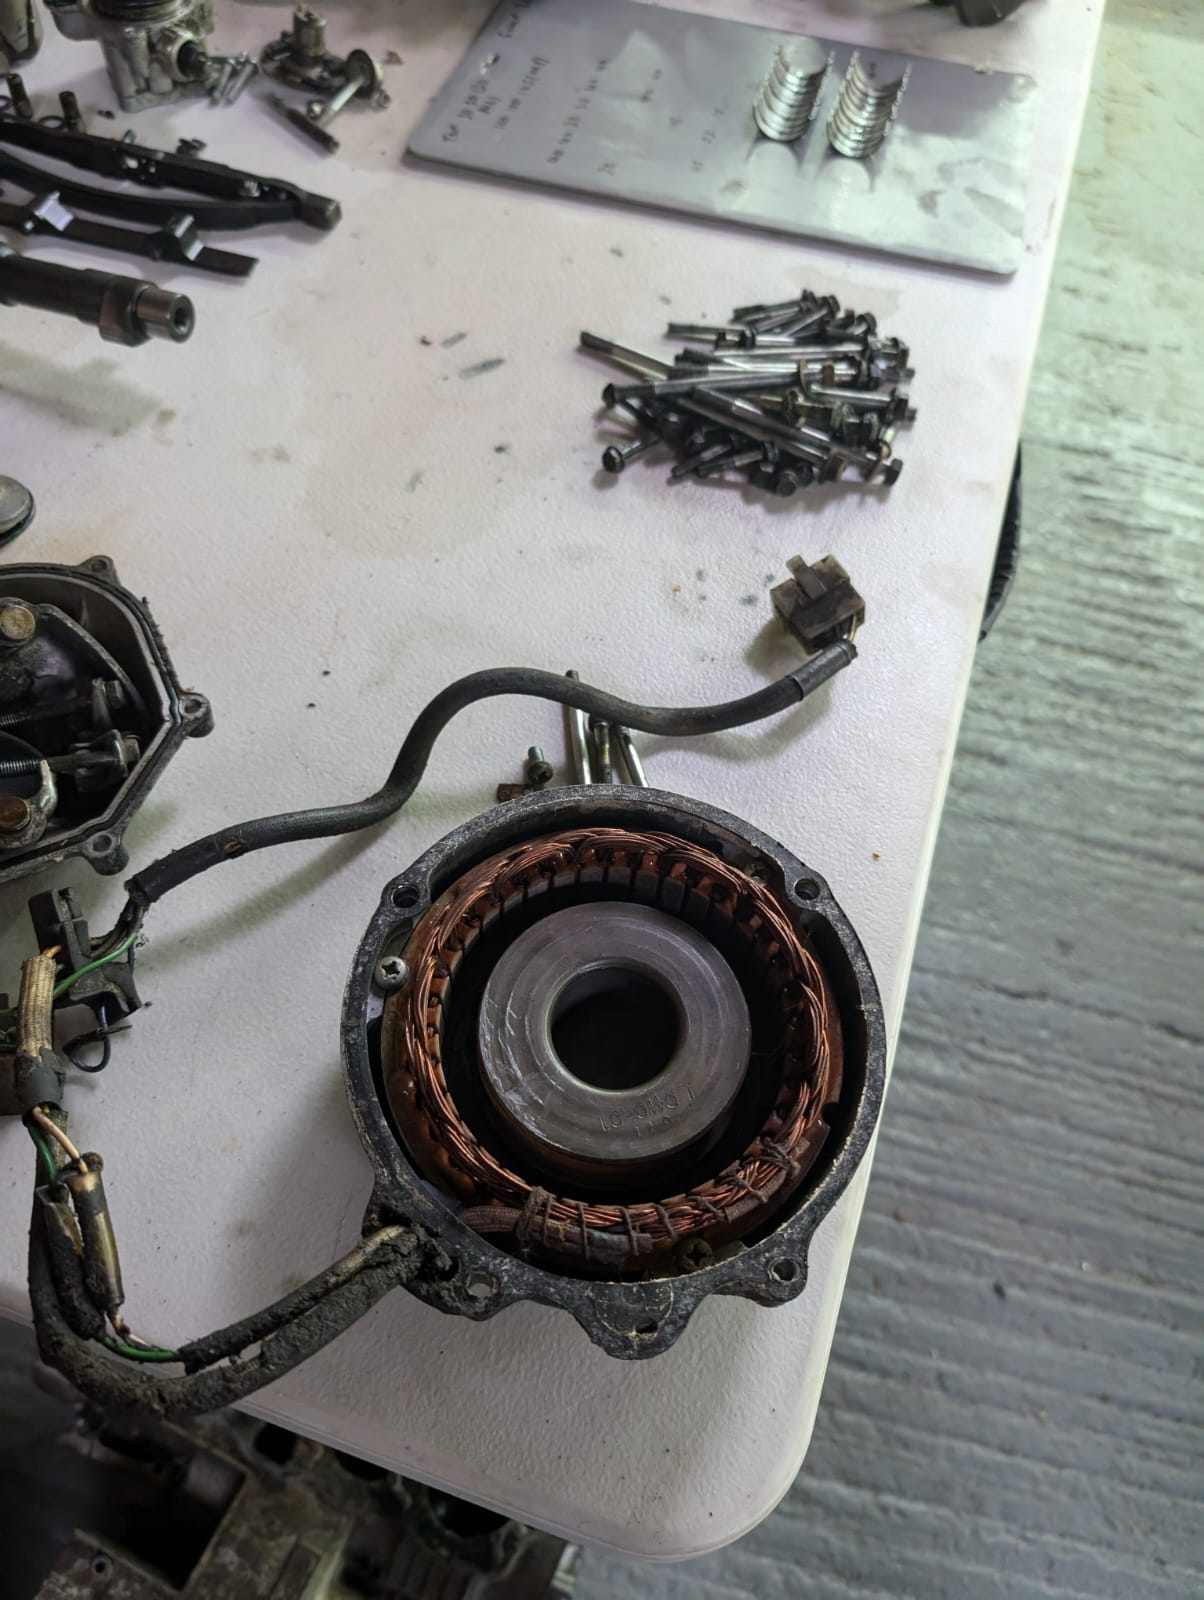
We take on a Esmerelda's Main Board
Part 1
We take on the central board of our latest project CB500/4 Esmerelda, we are going to strip it right down, refinish where possible, replace where necessary and rebuild. The unit consists of a back plate which carries the rectifier, regulator, main fuse, indicator relay, starter electro magnetic switch an area where the wiring harness makes it’s main connections.
A brief description of these parts the rectifier converts the AC current from the alternator into DC, the regulator regulating the current to the battery. The main fuse is located in an inline fuse box, the indicator relay is a more simple device than it appears, a simple current creates a magnet field drawing an inner switch towards it and when the circuit is made and it cancels the magnetic field so it drops away, hence the clicking you can hear when operational. The electro magnetic switch allows the battery to send its full power to the starter motor without going through the harness, the switch is activated by a positive charge being created once the starter button is pressed, this action then creates a current which in turn activates the electro magnet switch which connects the main cable from the battery to the starter motor, this is is a positive wire being earthed out through the engine via the starter motors own unit completing the circuit as it in turn comes alive and rotates.
Now we know what we are working with you will be able to locate the wires in the wiring diagram, once cleaned of course.
It is worth a couple of days before you want to do this job set the item on a plastic bag and liberally apply penetrating fluid to give the bolts the best chance of releasing easy. It is also useful to pop some fluid where the rubber mounts are on the board, these will come off easier with a bit of assistance.
Start by gently pricing open the two wire brackets which are part of the base, use long nose pliers to ease them enough to release the wires. Then remove the rectifier, two bolts hold it in place, remove and disconnect the three wires. Then move on to the indicator relay, remove the two wires noting the location nd slide the unit out of its rubber mount. Next remove the electro magnetic switch and remove all rubber parts. Next remove the regulator with a single nut fixing it to the base.
Fully dismantle the board, be aware of the steel bushes used in the rubber mounts, these allow the unit to be bolted in place whilst damping the unit and should easily come free. The rubber gaskets are old so take your time but will pop out with a bit of effort.
Once the item is fully dismantled you can start the cleaning process, the wires will have years of grime on them but also be very oily and this will be your friend as they clean up amazingly well. Use a good degreaser and an old tooth brush with some tissue and bit by bit take the oily debris away, this takes a bit of care as the wires are close, a twist of the harness allows the wires to open up, some new black electrical tape over areas the old tape has lost it’s adhesion and you’re on your way.
The base board may look rough now but a trip to your local powder coater and this will be as good as new, the rubber holders and gromets we find come out well after vapour blasting, put them in with a load to keep the price down. Our rectifier was replaced as we found a fairly clean one on Ebay, the starter solenoid (electro magnetic switch) was good and the indicator relay was in amazing clean condition so we can reuse it. The main cable from the battery again was pretty good, a clean and reuse it.
Once the parts return from their various specialists it is reassemble time.
Some images of the job so far


Suppliers to the classic motorcycle enthusiast
Please note we cannot verify these business', in our experience we have found them to be first rate
Polishing Services
Danny 07532 299829
Whether it is a side casing or a full alloy tank this is certainly the place for you!
Paint Supplies
RS Bike Paint Ltd
CPM House
10 Works Road
Letchworth Garden City
Hertfordshire
SG6 1LB
01707 273219
First rate for the supply of excellent quality original colour mixes.
Exhaust Components / Systems
Armour Motor Products Ltd
784 Wimborne Road
Bournemouth
Dorset
BH9 2HS
United Kingdom
Tel 01202 519409
Email: sales@armourmotorproducts.co.uk
Seats
SaddleCraft
Unit 1 Evans Yard
Templetown
South Shields,
NE33 5SH
Tel 0191 4556262
Email enquiries@saddlecraft.com
Seeing the work this company does is truly amazing, we have used on a number of occasions now and highly recommend them to you.
Moto Guzzi Parts
Gutsibits
Unit 30 Upper Mills,
Canalside,
Slaithwaite,
Huddersfield,
HD7 5HA
01484 841395
I spoke to Harris who was more than helpful, this company are a great source of parts for our V50.
Powder Coating
AMD Specialist Coatings
6, Derwent Court
Earlsway,
Gateshead
NE11 0TF
info@amdcoatings.co.uk
0191 4875758
This operation are a real find, they understand our type of work and the finishes available and all supplied by the nicest of people.
Chrome
Prestige Electro Plating
unit 6, Cliff Street Industrial Estate,
Mexborough
S64 9HU
01709 577 004
Fixings
M and S Fixings (Masfix)
Newburn Industrial Estate,
Riverside Works,
Shelley Rd,
Newcastle upon Tyne
NE15 9R
0191 2645333
Superb operation who supply all sorts of bolts and can order in things like axle bolts etc where required.
Engine Rebuilds
Centurian Motorcycle Projects
A real tech guy who knows his motorcycles! Takes his time but he is well worth the wait.
Artist for Motorcycles
Mr Andy Crabb
https://andycrabb.wordpress.com
Andy can be contacted on a.crabb767@gmail.com
We love his work, he loves the old Hondas saying the 500/4 was, if I remember correctly "the best proportioned motorcycle" to paint, we agree of course!